
For those who are interested, here is what it took. I want to thank my Dad for spending a few days helping me develop the concept and put together a majority of the components. I couldn't have done it without him, so thanks Dad!!
My Design

This bed is something I designed after trying in vain to find something on the Internet that was roughly equivalent. I wanted a full-sized mattress on the bottom bunk and a twin on top. The options in the store and the plans I found weren’t quite right. We saw options we liked but not the whole package. My wife saw on Amazon.com a bunk bed that featured cubicle storage on the end of the bed that doubled as stairs. We saw a simple frame design in another bed that we borrowed. I liked the idea of keeping the existing twin mattresses and so the trundle bed underneath was born.
These are not the best-written instructions, but hopefully it will give you the inspiration you need to build your own. Please let me know if you have any questions, and have fun!
The Bed
These are three bed frames stacked vertically with two end pieces, each made of two legs and a support beam.
Legs/Ends Design

This is as simple as it looks. 3 boards affixed with two bolts at each crossing. So this means 4 bolts to each end. The cross beam is for structural support (keep it from wobbling). I affixed these cross boards on the “inside” or facing the bed because I didn’t want it to get in the way of the cubicles and I thought it looked better.
One End (double the quantity of this parts list to get both ends made)
Part | Quantity | Dimensions | Notes |
AA | 2 | 2” x 6” x 80” | The legs |
AB | 1 | 1” x 6” x 40 ½” | Support beam |
Hex bolts | 4 | 3/8” x 3” | 2 bolts for one AA/AB union, and 2 for the other AA/AB union |
Flat washers | 8 | 3/8” | One on each head end of the bolt and one on each nut end. |
Lock washers | 4 | 3/8” | One goes on the bolt just before each nut. |

You can assemble this now, or it might be useful to assemble these once the bed boxes are affixed to the legs (as pictured here). This would allow you to position the support beam optimally to ensure a square and level bed. If you’re going to wait, then don’t drill the holes for the bolts until you are ready.
Bed Frames
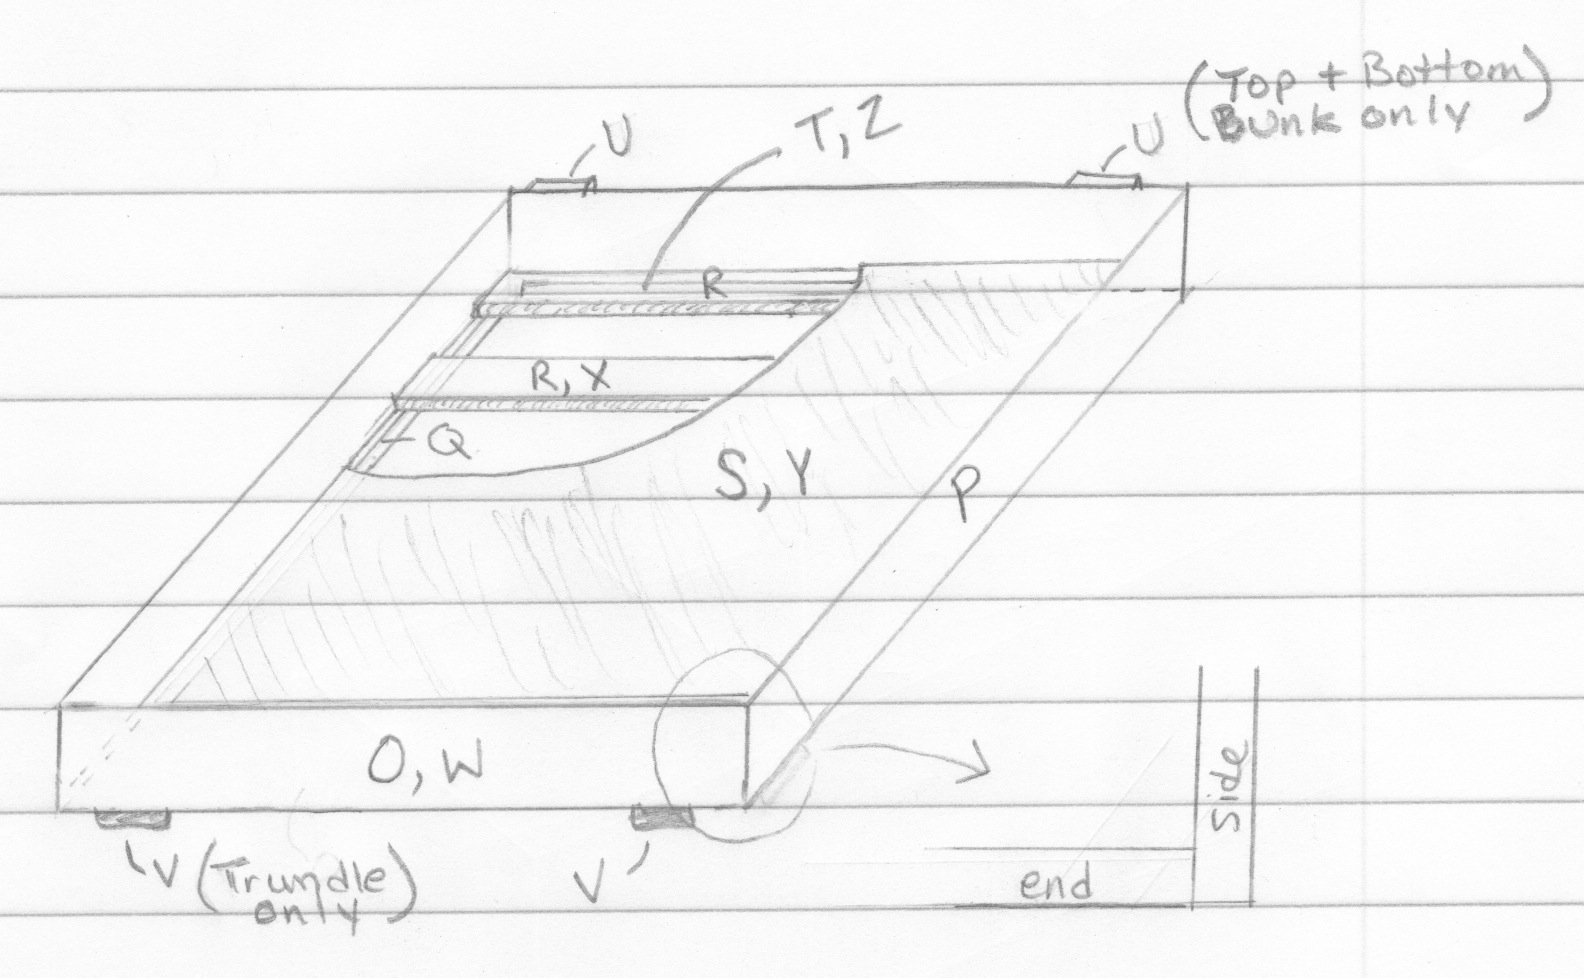
As the diagram shows, the bed is a 4-board frame with a supporting structure for the mattress. The support structure starts with 1”x2” boards which then support cross-members, which then support a thin particle board sheet that provides a consistent base for the bed. (This is important since the mattresses I used are not box spring style; they need a “box” to lay in.)
Trundle
We start with the trundle bed and will have to repeat this parts list for the top bunk, then bottom bunk, with slight adjustments for each.
Part | Quantity | Dimensions | Notes |
O | 2 | 1” x 6” x 40 ½” | End boards |
P | 2 | 1” x 6” x 77 ¼” | Side boards |
Q | 2 | 1” x 2” x 75 ½” | Support rail for side boards |
T | 2 | 1” x 2” x 38 ½” | Support rail for end boards |
R | 7 | 1” x 3” x 40 ½” | Cross-member supports for the plywood insert |
S | 1 | ? x 40” x 76” | This is the plywood insert. The width is up to you but think thin. I believe I picked the thickness around 3/32”. |
V | 4 | ¾” x 1 x 6” | These are the “rails” that affix to the end boards – two for each end board and provide the raised separation from your floor. |
Sliders | 4 (1 pack) | These are a pack of plastics rectangular sliders that affix via adhesive to the bottom of each rail. You might need to adjust the shape and size of your rails to match the sliders you purchase. |

First build the large box with parts O and P. Then affix parts Q and T to the bottom edges of the box. Then attach the 7 “R” boards, 1 at each end and then the other 5 spaced evenly across. You can use a nail gun for all of this work; take care to keep things as square as possible. Finally, insert the plywood and nail it down to the cross members; this is your last change to make the box square.

Looking at the top bunk from below. You can see the 1”x2” support board that the cross members are nailed down onto, and the large particle board they are resting on.
Next build the top similar to the trundle. All dimensions and parts are the same, except we remove the rails. We will add separators in the bed assembly phase.
Part | Quantity | Dimensions | Notes |
O | 2 | 1” x 6” x 40 ½” | End boards |
P | 2 | 1” x 6” x 77 ¼” | Side boards |
Q | 2 | 1” x 2” x 75 ½” | Support rail for side boards |
T | 2 | 1” x 2” x 38 ½” | Support rail for end boards |
R | 7 | 1” x 3” x 40 ½” | Cross-member supports for the plywood insert |
S | 1 | ? x 40” x 76” | This is the plywood insert. The width is up to you but think thin. I believe I picked the thickness of around 3/32”. |
Bottom Bunk
Next build the top similar to the trundle. All dimensions and parts are the same, except we remove the rails and we add the separators (part “U”).
Part | Quantity | Dimensions | Notes |
W | 2 | 1” x 6” x 55 ½” | End boards |
P | 2 | 1” x 6” x 77 ¼” | Side boards |
Q | 2 | 1” x 2” x 75 ½” | Support rail for side boards |
Z | 2 | 1” x 2” x 53 ½” | Support rail for end boards |
X | 7 | 1” x 3” x 55 ½” | Cross-member supports for the plywood insert |
Y | 1 | ? x 55” x 76” | This is the plywood insert. The width is up to you but think thin. I believe I picked the thickness of around 3/32”. |
Bed Assembly
After bolting together the two end pieces and after the top and bottom bunks are built, it’s time to put them together. You will need the hardware and separators (part “U”) which will slightly widen the distance between ends of the bed. This will allow the trundle bed to fit more easily underneath.
Part | Quantity | Dimensions | Notes |
U | 4 | 1” x 6” x 5 ½” | These are separators that are inserted between the box and the legs at one end. I put them on the end opposite the cubicle stairs. (2 for the top bunk, 2 for the bottom bunk.) The purpose is to provide space so that the trundle bed will have room to slide underneath. |
Hex bolts | 8 | 3/8” x 3 ½” | Longer bolts are needed to accommodate the spacer (part “U”) end |
Hex bolts | 8 | 3/8” x 3” | This is for the end closer to the cubicle stairs |
Flat washers | 32 | 3/8” | One on each head end of the bolt and one on each nut end. |
Lock washers | 16 | 3/8” | One goes on the bolt just before each nut. |
Cubicle Stairs

Incomplete cubicle stairs pictured above. Each box is assembled but not yet attached, and not trim or support boards are in place.

This consists of 4 horizontal boxes with dividers at 14” increments. For stability, a horizontal 1x3 backing board is attached at the back top of each box. (You can see them in the design here). It’s important when putting this together to be consistent on the 14” measurement so that the box above lines up with the box below.
Main Stairs

Part | Quantity | Dimensions | Notes |
A | 16 | ½” x 18” x 14” | All 4 large boards for the top box and the verticals for the other boxes |
B | 2 | ½” x 18” x 28” | Top and bottom pieces for one box |
C | 2 | ½” x 18” x 42” | Top and bottom pieces for one box |
D | 2 | ½” x 18” x 56” | Top and bottom pieces for the largest box |
E | 1 | 1” x 3” x 14” | Backing board for top box |
F | 1 | 1” x 3” x 28” | Backing board for next box |
G | 1 | 1” x 3” x 42” | Backing board for next box |
H | 1 | 1” x 3” x 56” | Backing board for bottom box |
I | 5 | Square bracket 18” lengths of trim | “L” bracketed edging/trim to protect little legs from getting scraped on the boxes; also adds a nice slip guard and look (See note on shortening these in the handrail comment below) |
J | 4 | ¾” x 18” lengths | Small thin edging for the bottom stair face of each box to add a nice look (See note on shortening these in the handrail comment below) |
Build each of the 4 boxes one at a time. The vertical boards fit inside the top and bottom boards for each box. Having someone help you position each vertical board is really helpful. I also found it a huge help to use a pneumatic nail guns to speed up the process and tack the boards together until screws can be affixed at discrete points. I found the ½” boards to be sufficient, but the engineer inside of me would rather have used ¾” boards for better stability. I’ve learned that over-building just makes the furniture heavy and not pretty or more useful.
Take care to square things up before you start nailing or screwing; I found it difficult to get the pieces square later, even with the help of the 1” x 3” back-support boards.
Stair Rails
Part | Quantity | Dimensions | Notes |
K | 4 | 1 ½” x 1 ¾” x 30” | These are actually from a 2”x4” board split length-wise down the middle with a table saw. You could do the same with 1”x1” boards but these seemed straighter, and I already had 2”x4” boards on hand. |
L | 1 | 1 ½” x 1 ¾” x 52” | Hand rail (again from the 2”x4” board split length-wise) |
M | 1 | 1 ½” x 1 ¾” x 17 ½” | Horizontal top rail, again from the “2x4” board |
Hex Bolts | 8 | 3/8” x 3” | Used for the vertical handrail posts, holes are drilled near the top and bottom of each box piece where the rail is affixed. See picture for a better idea. |
Hex Bolts | 3 | 3/8” x 3 ½” | These affix the hand rail to the vertical posts |
Hex Bolts | 1 | 3/8” x 5” | This is needed where the top vertical post, the horizontal rail and the diagonal rail come together in one joint |
Flat Washer | 24 | 3/8” | |
Lock Washer | 12 | 3/8” | |
Nuts | 12 | 3/8” |

Because of the trim used earlier I was forced to dado cuts into the vertical handrail posts. You can avoid this by making the trim shorter so that it doesn’t get in the way of these posts. If you did it the way I did, you will have to do something similar to the above picture. Not a big deal if you have a dado kit for your table saw, or you can use a chisel set or probably some other means. I recommend shortening the trim to skip this step.
Stability
Once fully assembled, the cubicle stairs should be mounted at two points to the bedposts (legs) to improve stability and ensure the stairs and bed stay well connected.

Part | Quantity | Dimensions | Notes |
N | 2 | 1” x 3” x 2” | This is just a block used to separate the stairs from the leg but still allow them to be affixed. See picture above. |
Hex Bolts | 2 | 3/8” x 3 ½” | |
Flat Washer | 4 | 3/8” | |
Lock Washer | 2 | 3/8” | |
Nuts | 2 | 3/8” |


